Inside: This classic recipe, with its flaky crust and heavenly lemon custard, is a culinary masterpiece that promises to tantalize taste buds and awaken the senses with its irresistible aroma and delightful medley of textures. Embrace the art of pie-making with this simple yet elegant lemon pie recipe that is sure to become a cherished staple in your dessert repertoire.

What is a Lemon Meringue Pie?
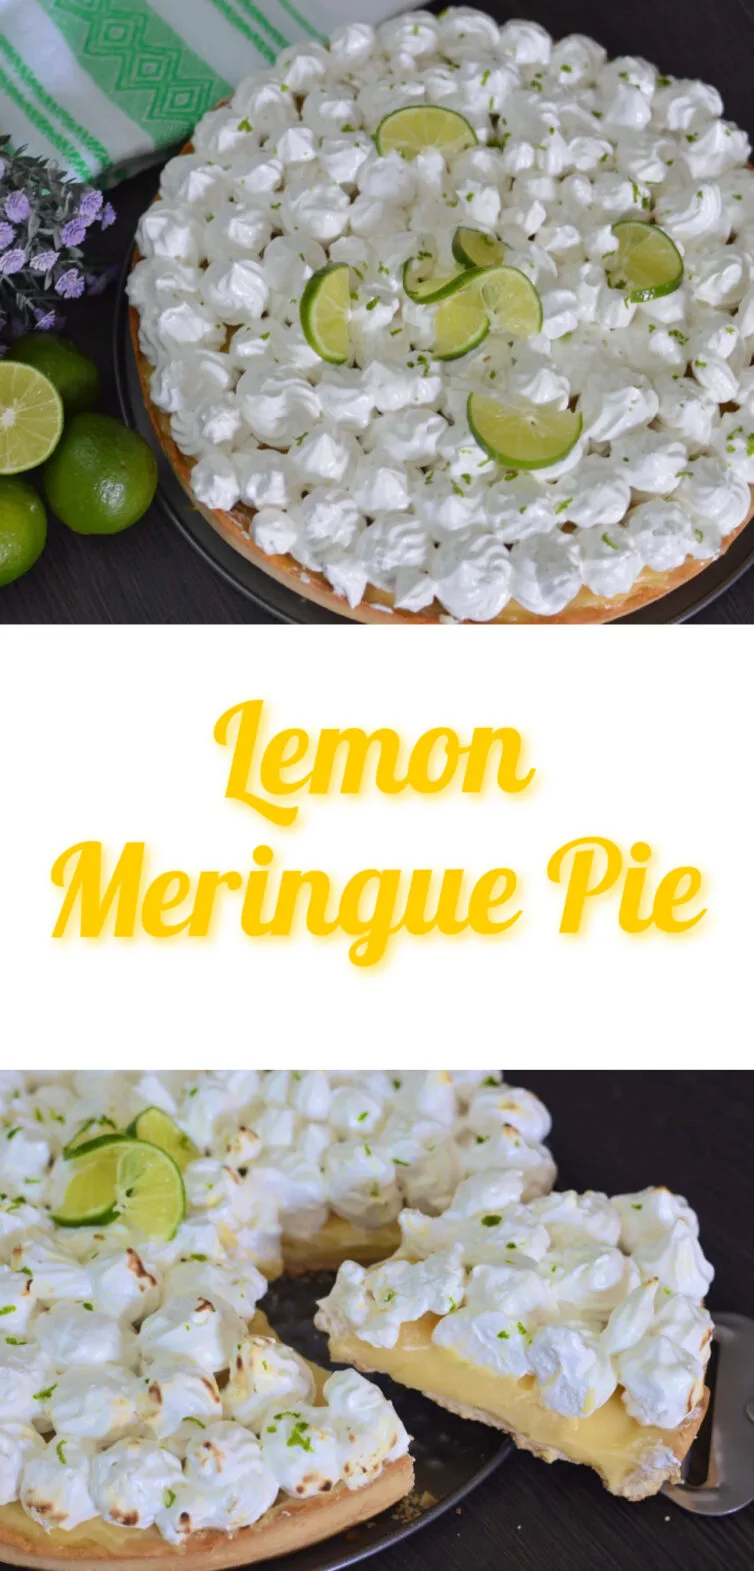
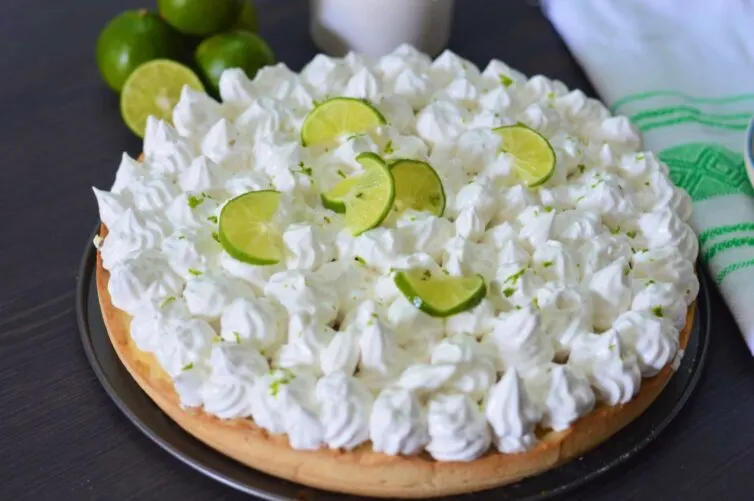
Lemon meringue pie is a classic dessert that consists of a flaky pie crust filled with a rich, tangy lemon custard and topped with a fluffy, golden-brown meringue.
The pie is known for its perfect balance of tart and sweet flavors, creating a delightful contrast that is beloved by many.
The filling is typically made from a mixture of lemon juice, zest, eggs, sugar, and sometimes cornstarch or flour to thicken the custard.
The meringue is created by whipping egg whites and sugar together until they form stiff peaks, which are then spread over the lemon filling and baked until the meringue achieves a crisp and golden exterior.
The combination of the zesty lemon filling and the light, airy meringue creates a dessert that is both refreshing and indulgent, making it a popular choice for those with a sweet tooth and an affinity for citrus flavors.
How To make Lemon Pie
INGREDIENTS:
300g all-purpose wheat flour (2 cups)
60g Sugar (¼ cup)
1 stick of very cold unsalted butter
1 grade egg (this must be cold)
1 teaspoon salt
Filling:
1 ½ cups of whole milk
½ cup Cornstarch
150g Sugar (1 cup)
½ cup freshly squeezed lemon juice
Lemon zest (green part only)
4 egg yolks
1 stick of unsalted butter
SWISS MERINGUE
4 egg whites
300g Sugar (about 1 cup)
PREPARATION:
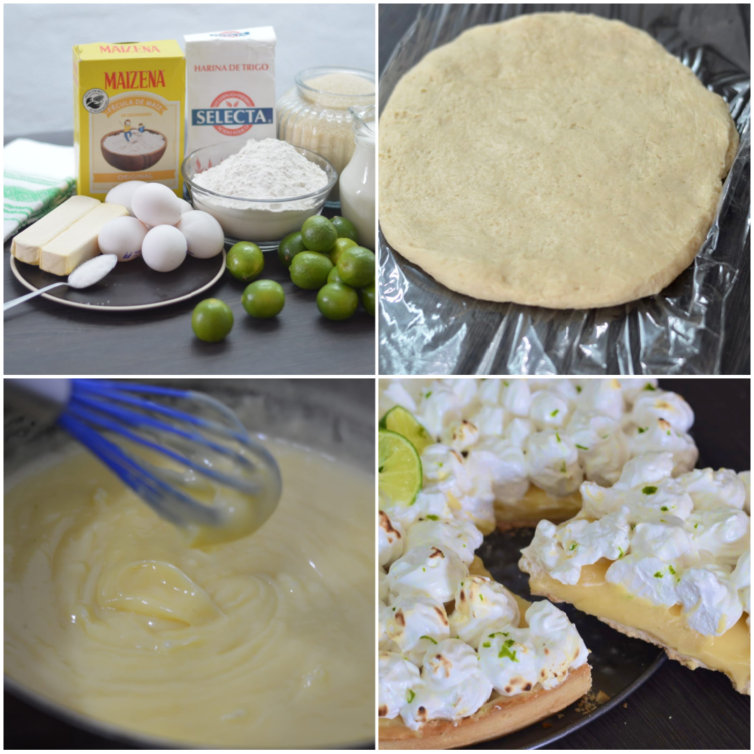
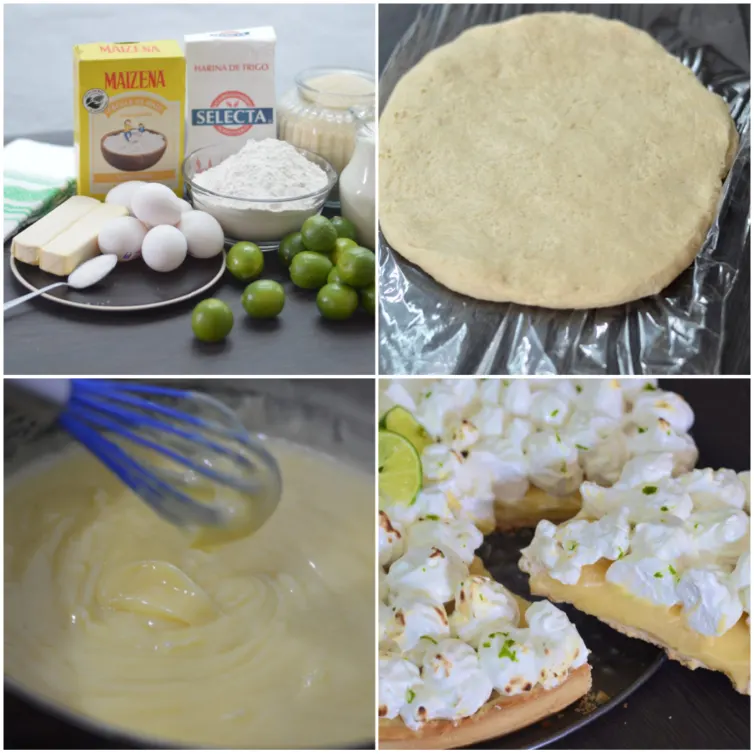
1. We begin by sifting the flour into a bowl, with the help of a strainer. (This is done to remove any lumps that the flour may have).
2. Add the teaspoon of salt and ¼ cup of sugar. We stir a little to integrate the ingredients.
3. Add the cubed butter, which must be very cold. We stir with the help of a mixer for 2 min. until the ingredients have been well integrated and the consistency of the dough is sandy. (The butter is put very cold to form a sandy paste, otherwise it will become a sticky dough).
4. We lightly beat the egg (which must also be very cold), and add it to the flour and butter mixture, continuing to beat for approximately 1 min. more or until the butter has been incorporated into the flour. If you notice that the mixture is still very dry, add a splash of water just to compact the mixture. (Do not add too much water, because the mixture will be sticky and will be very difficult to handle). The dough should have a firm consistency that, when pressed a little, compacts but does not stick to your hands).
5. When the dough is ready, we place it on plastic wrap and press it a little to flatten it as much as possible. We wrap it in plastic wrap and refrigerate it for 2 hours so that the dough rests and becomes a little hard.
6. After the resting time has passed, we take the dough out of the refrigerator, we remove the plastic wrap and we divide it into 4 pieces, we flatten it a little (without kneading) to integrate it again, just a little so that the dough does not heat up.
7. It’s time to form the base. On a flat surface or kitchen counter, sprinkle a little flour, place the dough and sprinkle flour on top, with a rolling pin we begin to stretch the dough until it is half a centimeter thick and can cover the pie pan that you have in home.
8. Once you have your dough stretched to the size of your mold (including the walls), roll it a little on the rolling pin and place it on the mold (if your mold is not Teflon, I recommend that you grease it previously). With the help of your hands, mold the dough to adapt it to the shape of your mold.
9. When the dough is well adapted to the shape of your mold, remove the excess with a knife or rolling pin, passing along the edges and pressing a little.
10. Refrigerate the mold for 15 minutes before baking so that the dough hardens a little.
11. After the time has passed, we take the mold out of the refrigerator and cover it with aluminum foil, giving the shape of the mold and adding a little legumes to it to give it a little weight and so that the dough does not shrink when it is cooked. (you can use beans, chickpeas, etc.).
12. We bake the base at 200 degrees for 15 min.
13. After 15 minutes, we take the mold out of the oven and remove the aluminum foil with the legumes that you put in it. Be careful not to burn yourself.
14. Beat the yolk of an egg and varnish the base of the pie so that it takes on a golden color when baked. We put it back in the oven and bake for 15 min. at 180 degrees.
15. After the baking time has passed, we remove the base from the oven and let it cool completely. While we prepare the filling.
Lemon Cream Filling:
Heat the milk in the microwave or on the stove, when it is already hot we reserve a moment.
Place the cornstarch and sugar in a bowl, stir a little to integrate both ingredients.
Next add the freshly squeezed lemon juice, the lemon zest and the egg yolks, continue mixing so that all the ingredients are integrated and all the lumps are dissolved.
Without stopping mixing, add the hot milk little by little, do not stop stirring while adding the milk to prevent the egg yolks from curdling.
When you have all the ingredients well integrated, place the milk mixture on the stove over medium heat for 10 minutes. Without stopping stirring to prevent the cream from sticking to the pot, when the cream begins to thicken, cook for a few more minutes until you have a very consistent, creamy and firm mixture.
When the cream is ready, lower it from the heat and add the butter squares at room temperature, continue stirring until the butter dissolves. We transfer it to a separate bowl and cover it with plastic wrap (touching the mixture) to prevent it from forming a kind of crust and let it cool.
Swiss Meringue:
In a saucepan over a double boiler, place the cup of sugar and the 4 egg whites, put the double boiler over medium heat and stir the egg whites and sugar constantly to prevent the egg whites from cooking. .
We continue stirring until all the sugar has dissolved. You will know that it is ready if you touch the mixture with your fingers and you no longer feel any grain of sugar.
When the sugar has melted well, we put the mixture in a bowl and begin to beat with a mixer for 10 minutes at medium speed. After that time and the meringue begins to whip, we increase the speed to the highest speed of your mixer. and we continue beating for 15 min. more or until the meringue takes on a firm, creamy and shiny consistency.
We take the pie out of the refrigerator, remove the plastic wrap and remove it from the pie mold, place it on an extended plate to start decorating it.
We place the meringue in a pastry bag and a piping bag of your choice (if you don’t have one, you can use a plastic bag). We begin to form little meringue fluffs on top of the pie starting from the outside in until the entire pie is covered.
At this point you can toast the meringue tufts with a kitchen blowtorch, but if you don’t have one you can leave them as is and decorate it however you prefer.
For the lemon pie to keep very well, you must keep it refrigerated. You now have a creamy and delicious lemon pie ready, enjoy.
How do you store leftover pie?
Storing lemon meringue pie properly is crucial to maintaining its texture and flavor. Here are some guidelines on how to store lemon meringue pie:
- Refrigeration:
- Due to the perishable nature of the lemon filling and meringue topping, it’s best to store a lemon meringue pie in the refrigerator.
- Place the pie in the refrigerator as soon as it has cooled to room temperature.
- Covering:
- Cover the pie loosely with plastic wrap or aluminum foil. Avoid wrapping it too tightly to prevent the delicate meringue from getting crushed.
- Avoid Moisture:
- Moisture can affect the texture of the meringue, making it soft or weeping. Store the pie away from humid areas and avoid placing it near foods with strong odors in the refrigerator.
- Consume Promptly:
- Lemon meringue pie is best enjoyed within a day or two of baking. The meringue may start to break down and lose its texture over time.
- Freezing (Optional):
- If you need to store the pie for a more extended period, you can freeze it. However, keep in mind that meringue may not retain its original texture after freezing.
- Freeze the pie uncovered initially until the meringue is firm, then wrap it tightly with plastic wrap or aluminum foil and place it in an airtight container.
- Thawing:
- When ready to eat a frozen pie, allow it to thaw in the refrigerator. Avoid thawing at room temperature to minimize the risk of bacterial growth.
Remember that while storing lemon meringue pie, especially with meringue toppings, requires some care, consuming it fresh is the ideal way to experience the pie at its best. If you have leftover slices, consider covering the exposed edges of the meringue with plastic wrap before refrigerating to help preserve its texture.
Check out these other desserts!
- The Most Delicious and Authentic Chocoflan Recipe
- The Best (and easiest) Flan Napolitano Recipe
- Lemon Carlota


Lemon Pie
Ingredients
Crust
- 300 g all-purpose wheat flour 2 cups
- 60 g Sugar ¼ cup
- 1 stick of very cold unsalted butter
- 1 grade egg this must be cold
- 1 teaspoon salt
Filling
- 1 ½ cups of whole milk
- ½ cup Cornstarch
- 150 g Sugar 1 cup
- ½ cup freshly squeezed lemon juice
- Lemon zest green part only
- 4 egg yolks
- 1 stick of unsalted butter
Swiss Meringue
- 4 egg whites
- 300 g Sugar about 1 cup
Instructions
- We begin by sifting the flour into a bowl, with the help of a strainer. (This is done to remove any lumps that the flour may have).
- Add the teaspoon of salt and ¼ cup of sugar. We stir a little to integrate the ingredients.
- Add the cubed butter, which must be very cold. We stir with the help of a mixer for 2 min. until the ingredients have been well integrated and the consistency of the dough is sandy. (The butter is put very cold to form a sandy paste, otherwise it will become a sticky dough).
- We lightly beat the egg (which must also be very cold), and add it to the flour and butter mixture, continuing to beat for approximately 1 min. more or until the butter has been incorporated into the flour. If you notice that the mixture is still very dry, add a splash of water just to compact the mixture. (Do not add too much water, because the mixture will be sticky and will be very difficult to handle). The dough should have a firm consistency that, when pressed a little, compacts but does not stick to your hands).
- When the dough is ready, we place it on plastic wrap and press it a little to flatten it as much as possible. We wrap it in plastic wrap and refrigerate it for 2 hours so that the dough rests and becomes a little hard.
- After the resting time has passed, we take the dough out of the refrigerator, we remove the plastic wrap and we divide it into 4 pieces, we flatten it a little (without kneading) to integrate it again, just a little so that the dough does not heat up.
- It’s time to form the base. On a flat surface or kitchen counter, sprinkle a little flour, place the dough and sprinkle flour on top, with a rolling pin we begin to stretch the dough until it is half a centimeter thick and can cover the pie pan that you have in home.
- Once you have your dough stretched to the size of your mold (including the walls), roll it a little on the rolling pin and place it on the mold (if your mold is not Teflon, I recommend that you grease it previously). With the help of your hands, mold the dough to adapt it to the shape of your mold.
- When the dough is well adapted to the shape of your mold, remove the excess with a knife or rolling pin, passing along the edges and pressing a little.
- Refrigerate the mold for 15 minutes before baking so that the dough hardens a little.
- After the time has passed, we take the mold out of the refrigerator and cover it with aluminum foil, giving the shape of the mold and adding a little legumes to it to give it a little weight and so that the dough does not shrink when it is cooked. (you can use beans, chickpeas, etc.).
- We bake the base at 400 degrees F for 15 min.
- After 15 minutes, we take the mold out of the oven and remove the aluminum foil with the legumes that you put in it. Be careful not to burn yourself.
- Beat the yolk of an egg and varnish the base of the pie so that it takes on a golden color when baked. We put it back in the oven and bake for 15 min. at 180 degrees.
- After the baking time has passed, we remove the base from the oven and let it cool completely. While we prepare the filling.
Lemon Cream Filling:
- Heat the milk in the microwave or on the stove, when it is already hot we reserve a moment.
- Place the cornstarch and sugar in a bowl, stir a little to integrate both ingredients.
- Next add the freshly squeezed lemon juice, the lemon zest and the egg yolks, continue mixing so that all the ingredients are integrated and all the lumps are dissolved.
- Without stopping mixing, add the hot milk little by little, do not stop stirring while adding the milk to prevent the egg yolks from curdling.
- When you have all the ingredients well integrated, place the milk mixture on the stove over medium heat for 10 minutes. Without stopping stirring to prevent the cream from sticking to the pot, when the cream begins to thicken, cook for a few more minutes until you have a very consistent, creamy and firm mixture.
- When the cream is ready, lower it from the heat and add the butter squares at room temperature, continue stirring until the butter dissolves. We transfer it to a separate bowl and cover it with plastic wrap (touching the mixture) to prevent it from forming a kind of crust and let it cool.
Swiss Meringue:
- In a saucepan over a double boiler, place the cup of sugar and the 4 egg whites, put the double boiler over medium heat and stir the egg whites and sugar constantly to prevent the egg whites from cooking. .
- We continue stirring until all the sugar has dissolved. You will know that it is ready if you touch the mixture with your fingers and you no longer feel any grain of sugar.
- When the sugar has melted well, we put the mixture in a bowl and begin to beat with a mixer for 10 minutes at medium speed. After that time and the meringue begins to whip, we increase the speed to the highest speed of your mixer. and we continue beating for 15 min. more or until the meringue takes on a firm, creamy and shiny consistency.
- We take the pie out of the refrigerator, remove the plastic wrap and remove it from the pie mold, place it on an extended plate to start decorating it.
- We place the meringue in a pastry bag and a piping bag of your choice (if you don’t have one, you can use a plastic bag). We begin to form little meringue fluffs on top of the pie starting from the outside in until the entire pie is covered.
- At this point you can toast the meringue tufts with a kitchen blowtorch, but if you don’t have one you can leave them as is and decorate it however you prefer.
- For the lemon pie to keep very well, you must keep it refrigerated. You now have a creamy and delicious lemon pie ready, enjoy.